
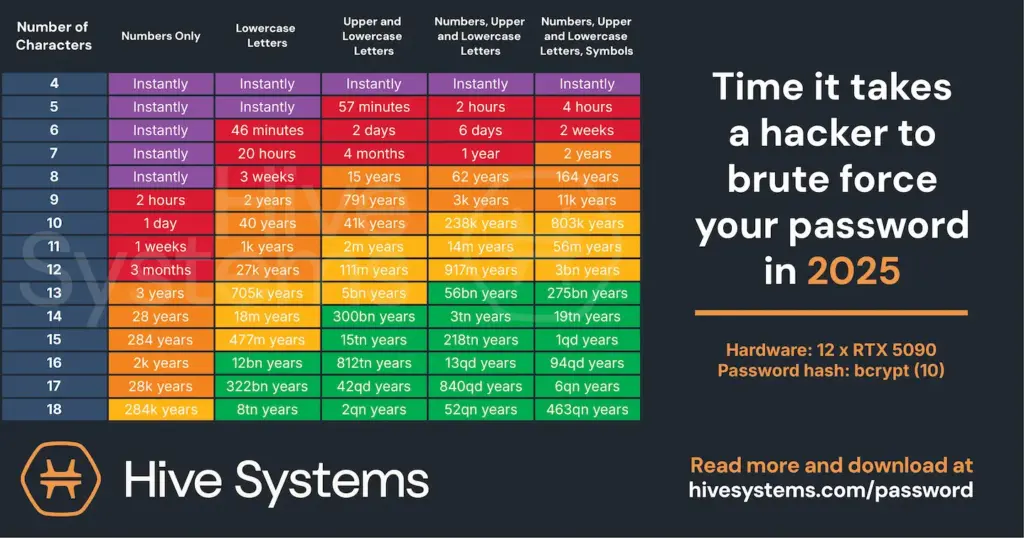
Password is a thing of the past. Or at least it should be. Passwords can easily be hacked because they are not complex enough. If you create very complex passwords that you can’t remember, you will need to write them down for future reference. Hive Systems has tested how long it takes to hack a password in 2025. You can see the result in the table below. The time it takes to brute-force a password decreases each year as hardware becomes more powerful.
How to prevent your password from getting brute-forced?
The short answer is that you don’t use passwords to access your servers. Instead, you choose an alternative method. In this article, we will explore how to access Linux servers using SSH keys rather than passwords. We will create an SSH key based on the Ed25519 algorithm. This algorithm is preferred for a number of reasons, which are outlined below.
- Security: Ed25519 is based on the EdDSA (Edwards-curve Digital Signature Algorithm), offering strong security and resilience against various cryptographic attacks. It is considered more resistant to certain types of attacks than RSA.
- Performance: Ed25519 typically outperforms RSA in key generation, signing, and verification, enabling faster SSH connections and reduced computational load for both clients and servers.
- Key Length: Ed25519 achieves equivalent security with shorter keys than RSA, improving efficiency and reducing storage needs.
- Algorithm Maturity: Although RSA is a long-established standard, Ed25519 is widely adopted and has been thoroughly analyzed by cryptography experts.
Let’s secure access to your servers with SSH Keys
The first step is to create a key pair with ssh-keygen, the key generation tool that comes with OpenSSH on Linux, macOS and Windows 10/11. The -t ed25519 option tells ssh-keygen to create a key based on the Ed25519 algorithm. Use the following command to start the wizard.
ssh-keygen -t ed25519
The ssh-keygen wizard now walks you through a few prompts. Here is what each one means:
- Choose where to save the key: ssh-keygen asks
Enter file in which to save the key (/home/user/.ssh/id_ed25519):. Press Enter to accept the default, or type a name. I will name my key pair labkey by typinglabkey, which saves it in the current folder. - Set a passphrase: Next you are asked to
Enter passphrase (empty for no passphrase):and thenEnter same passphrase again:. The passphrase encrypts the private key on disk, so a stolen key file is useless without it. It is recommended to fill out a passphrase, but for this demonstration, I will leave it empty by pressing Enter twice. - Check the output: ssh-keygen confirms where your identification (private key) and public key have been saved, and prints the key fingerprint (
SHA256:...) together with a randomart image. The fingerprint is how you recognize the key later. - Skip the prompts (optional): If you want to script the key creation, you can answer all the prompts in one line with
ssh-keygen -t ed25519 -f ./labkey -C "labkey" -N "". Here-fsets the file name,-Cadds a comment that helps you identify the key, and-Nsets the passphrase (empty in this example).
The wizard has now created these two files:
- labkey
- labkey.pub
labkey is your private key and should never leave your machine. labkey.pub is your public key, which is the one you copy to your servers. To view the public key, run cat labkey.pub, and to show its fingerprint, run ssh-keygen -lf labkey.pub. If you change your mind about the passphrase later, you can add or change it without creating a new key by running ssh-keygen -p -f ./labkey.
Now you need to copy the labkey.pub file to the server you wish to secure with your SSH key pair. Type in this command to copy your public key to the server.
ssh-copy-id -i ./labkey.pub kubadmin@192.168.1.31
Once the public key has been copied to the server, you need to change your sshd_config file. Type in the command below to access the sshd_config file.
sudo nano /etc/ssh/sshd_config
Find the line shown below and remove the “#” sign to uncomment the line. Save and exit the file.
PubkeyAuthentication yes
Restart sshd on your system with the following command.
sudo systemctl restart ssh
Back on your client machine, you can now add the private key to your SSH agent. You can do that with the command below.
ssh-add ./labkey
The identity is now added, and you can test the SSH connection with this command.
ssh kubadmin@192.168.1.31
Notice that you don’t need to specify a password. That is because you are now using your private key to authenticate.
You have now increased the security of accessing your Linux server.